
TL;DR
Placing your rig in a closet can drastically cut noise, but only if you handle soundproofing, dampening reflections, and proper gear placement. Sealing gaps and controlling vibrations make all the difference. Distance remains the most powerful tool for noise reduction.
Imagine turning a tiny, noisy closet into a peaceful, silent workspace. It’s possible, but only if you understand the real game-changers—sealing gaps, dampening reflections, and positioning gear wisely. You might think foam panels are enough, but the truth is, the biggest wins come from smart placement and noise control at the source and along pathways.
This post cuts through the noise—literally—to show you how to make your “rig in the closet” quiet, cool, and effective. Whether you’re recording vocals or running a high-power AI workstation, these techniques can save you hours of frustration and hundreds in gear upgrades.
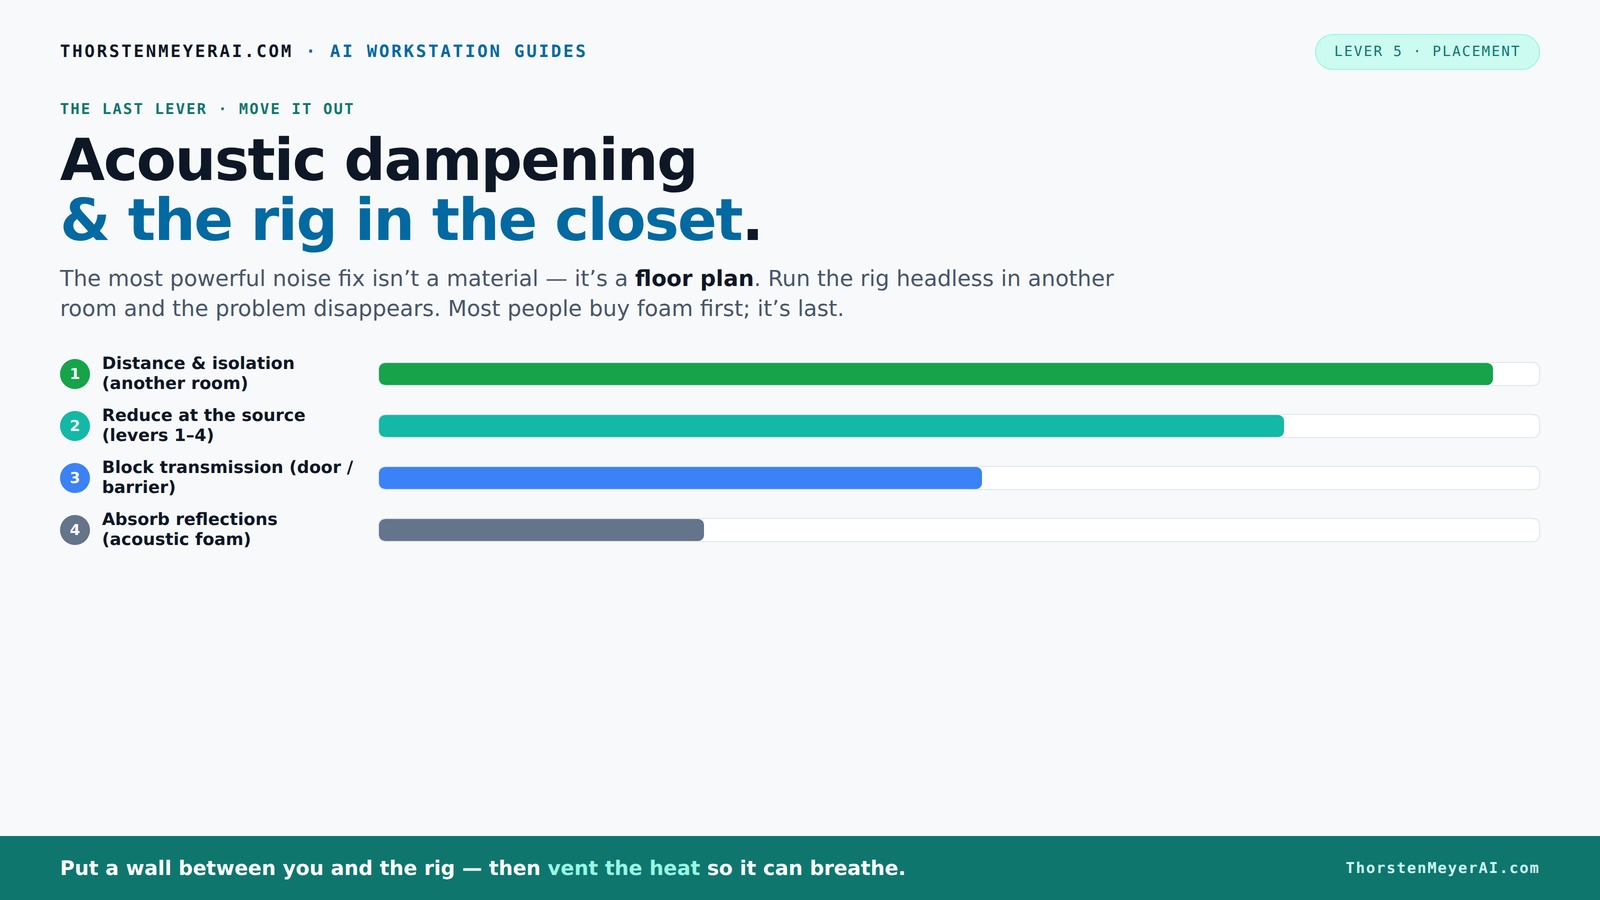
Acoustic dampening
& the rig in the closet.
The most powerful noise fix isn’t a material — it’s a floor plan. A rig you can’t hear because it’s in another room beats any amount of foam. Tap the approaches in Part 1 to see what actually works.
(another room)
(levers 1–4)
(door / barrier)
(acoustic foam)
Contain the noise, not the heat
Key Takeaways
- Distance and networked setups often outperform soundproofing in small spaces—move your rig to a different room if possible.
- Sealing gaps around doors and vents is more effective than adding foam alone for noise reduction.
- Treat reflections with broad coverage of soft materials—blankets, foam, or carpet—to tame echo in tiny closets.
- Ensure proper ventilation when placing equipment in enclosed spaces to prevent overheating.
- Decouple vibrations with rubber pads and grommets—this often makes a bigger difference than acoustic foam for low-frequency noise.

Focusound 52 Pack Acoustic Foam Panels 1" x 12" x 12" Sound Proof Foam Panles Soundproofing Noise Cancelling Wedge Panels for Home Office Recoding Studio with 300PCS Double-Side Adhesive
Soundproofing - Acoustic foam panels triangular grooves structure for better noise absorption, helps to reduce and absorb unwanted...
As an affiliate, we earn on qualifying purchases.
As an affiliate, we earn on qualifying purchases.
Why Distance Is Your Best Noise Solution (And How to Use It)
Starting with the simplest fix—distance—can save you a lot of headaches. Moving your rig into another room, basement, or closet immediately cuts noise. Think of it like parking a loud motorcycle in the garage: it’s loud nearby but barely audible from across the house.
In practice, a networked AI rig doesn’t need to sit on your desk. You can SSH into it from your quiet laptop, keeping your workspace silent while the powerful machine roars in another room. All that matters: a wired connection and good ventilation. This approach is often the fastest, cheapest, and most effective way to silence your setup.

2 Pack Studio Monitor Isolation Pads for Large Speakers Sound Insulation Studio Foam Prevents Vibrations Acoustic Speaker Isolation Pad High Density Fits Most Stands
Enhanced Sound Clarity: Saiqiang speaker isolation pads can reduce vibrations and resonance, providing cleaner, more accurate sound from...
As an affiliate, we earn on qualifying purchases.
As an affiliate, we earn on qualifying purchases.
The "Rig in the Closet": How to Do It Without Cooking Your Hardware
Putting a hot, noise-generating machine in a closet sounds perfect—until it overheats. A sealed space traps heat, and that heat can cook your rig. A steady 600W GPU load can push the temperature up by 10-15°F every hour if it’s not ventilated properly.
To avoid this, include active ventilation—like a quiet exhaust fan—and don’t fully seal the space unless you install temperature-controlled airflow. Some custom soundproof cabinets combine foam lining with ducted cooling and thermostats, keeping noise down and temps safe. For DIY, a simple vent with a small fan can make a big difference.
Check out this guide on reducing heat and noise in AI workstations for more details.
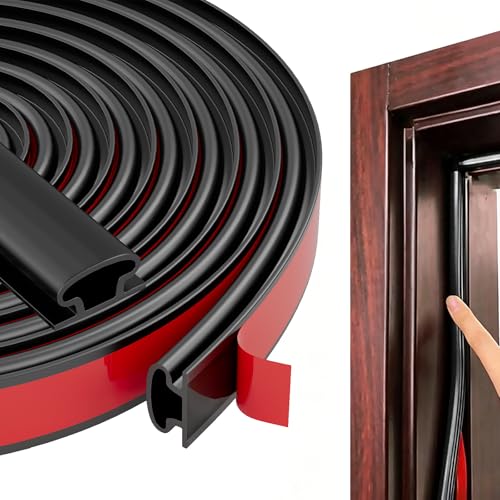
Black Rubber Weather Stripping Door Seal Strip, D Shape Door Weather Seal Strip, Self-Adhesive Soundproofing Frame Insulation Tape for Doors Frame/Window Seal,Blocks Cold Drafts Noise
【THICKENED SILICONE MATERIAL - COMPLETELY BARRIERING AIR AND NOISE】:The weather stripping is made of thickened TPE material with...
As an affiliate, we earn on qualifying purchases.
As an affiliate, we earn on qualifying purchases.
How to Seal Gaps and Reduce Sound Leakage in a Tiny Space
Gaps around the door, vents, and panel seams are the main escape routes for noise. Seal these first—weatherstripping, acoustic sealant, and draft blockers are your friends. Heavy curtains or blankets over door gaps also help. Think of it like closing all the windows before a storm.
Sealing these gaps is crucial because even small openings can significantly reduce the effectiveness of your soundproofing efforts. For example, a gap as thin as a quarter-inch can allow enough sound to escape or enter, undermining your other measures. Proper sealing creates a more airtight environment, which enhances the overall dampening effect. Keep in mind, however, that sealing alone isn’t enough—combining it with absorption treatments will give the best results.

IsoAcoustics Iso-Stand Series Speaker Isolation Stands with Height & Tilt Adjustment: Iso-155 (6.1” x 7.5”) Pair
6.1” (155mm) Wide x 7.5” (190mm) Depth. 3” (76mm) Height in low setting. 8.25” (210mm) height in tall...
As an affiliate, we earn on qualifying purchases.
As an affiliate, we earn on qualifying purchases.
How to Treat Reflection and Reverberation Inside Your Closet
Acoustic dampening inside the closet makes a huge difference. It’s about softening the sound that bounces off hard surfaces. Use thick blankets, foam panels, or plush carpets to absorb reflections. Place these near the mic, on side walls, and on the door to tame echo and harshness.
Reducing reflections isn’t just about making the space sound better; it directly impacts your recordings and monitoring accuracy. Excessive reverberation can cause your microphone to pick up echoes, making recordings muddy and difficult to edit. Covering reflective surfaces with soft materials prevents sound waves from bouncing around, leading to cleaner recordings and more accurate sound reproduction. Broad coverage ensures that sound energy is absorbed from multiple angles, which is especially important in small, enclosed spaces where reflections tend to intensify.
Gear Placement in a Small Closet: Tips for Better Sound & Less Noise
Where you put your gear inside the closet matters. Keep your microphone away from reflective walls and the door bounce. Place it near absorption materials, and angle it to avoid direct reflections. Position your speakers and monitors to minimize sound bouncing back at you.
Experiment with mic placement—sometimes moving it just 2 inches can reduce harsh echoes significantly. Use a reflection filter behind the mic if recording vocals, and keep noisy equipment on rubber pads or grommets to reduce vibrations.
Optimal gear placement minimizes unwanted sound reflections and reduces the chances of your equipment transmitting vibrations that can be picked up by sensitive microphones. Understanding how sound waves interact with your environment allows you to strategically position equipment so that it doesn’t contribute to the overall noise or echo, resulting in clearer recordings and a more controlled workspace.
Vibration? Vents? How to Stop Equipment from Shaking and Leaking Noise
Vibrations travel through the floor and walls, making noise worse. Use rubber isolation pads or mats under your rig. Decouple your hard drives, fans, and other vibrating parts with grommets or foam mounts.
If your closet contains a furnace or other vibrating appliances, add anti-vibration mounts or even a floating floor platform. These small tweaks prevent vibrations from radiating outward and turning into audible noise.
Understanding how vibrations propagate helps you identify the most effective mitigation strategies. For example, decoupling your equipment from the floor or wall surfaces reduces the transfer of low-frequency hums and rattles, which are often the hardest to block with acoustic foam alone. These measures not only quiet your setup but also protect your hardware from potential damage caused by excessive vibrations.
Comparison Table: Absorbing vs. Blocking Noise — What Works Best?
| Method | What It Does | Best For |
|---|---|---|
| Acoustic panels & blankets | Absorbs reflections & echo inside the space | Reducing reverberation, improving tone |
| Sealing gaps & barriers | Blocks sound from escaping or entering | Soundproofing & preventing leakage |
| Decoupling & vibration pads | Reduces structure-borne noise | Minimizing vibrations & low-frequency hum |
Frequently Asked Questions
How do I make my closet sound less echoey?
Add broad coverage of soft, absorbing materials—blankets, foam panels, carpets—especially on walls and near the mic. Experiment with placement to find what reduces harsh reflections best in your space.
What’s more effective—foam panels or sealing gaps?
Sealing gaps and adding barriers usually makes a bigger impact on noise reduction than foam alone. Foam absorbs reflections, but sealing prevents sound from leaking out or in.
Where should I place acoustic panels inside a closet?
Place panels on side walls, near the door, and behind the mic. Cover as much surface area as possible, especially on surfaces that reflect sound directly back to your mic.
Do foam panels work for a “rig in the closet” setup?
Yes, but only as part of a broader strategy. Foam reduces echo and harshness inside the space but doesn’t block sound transfer. Combine with sealing and decoupling for real noise reduction.
How can I prevent my equipment from vibrating and leaking noise?
Use rubber pads or grommets under your gear. Isolate hard drives and fans, and add anti-vibration mounts for loud appliances. This prevents structure-borne noise from radiating into the space and beyond.
Conclusion
The secret to a quiet closet rig isn’t just foam or sealing—it's a combination. Distance, proper ventilation, and thoughtful placement turn a noisy chaos into a controlled, clean sound environment. Before splurging on more foam, ask yourself: can I just move it?
Remember, the best noise control is often the simplest: put space between you and the noise source. Your ears—and your gear—will thank you for it.