Build a car emergency kit that helps you stay visible, contact help, manage minor problems, and stay comfortable while waiting for assistance. This guide is for drivers with any level of experience; allow about 45-60 minutes to gather supplies, pack them, and store them in your vehicle. The kit supports basic preparedness and does not replace roadside assistance, medical care, or professional repairs.

Get business pricing on garage and car supplies
- Business-only prices and quantity discounts
- Tax-exempt purchasing
- Multiple users, one account, clear invoices

Everlit Survival Car Emergency Kit with Digital Tire Inflator and First Aid Kit
- ✔ Jumper cable length: 12 feet
- ✔ Jumper cable gauge: 8 gauge
- ✔ Jumper cable output: 300 amps
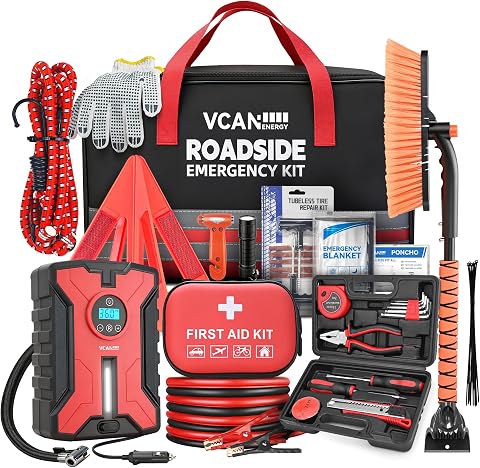
Car Emergency Safety Kit with Air Compressor, Jumper Cables, First Aid Kit, Snow Brush, and Ice Scraper
- ✔ Number of pieces: 170
- ✔ Jumper cable length: 12 feet
- ✔ Jumper cable gauge: 8 gauge

Car Roadside Emergency Kit, with Jumper Cables Automotive Kit,Car Safety Roadside Assistance Kit Headlamp,Tow Straps, Safety Hamm…
- ✔ Storage: Blow-molded case
- ✔ Jumper cables: Included; length and gauge not specified
- ✔ Air compressor: Included; capacity and power details not specified
Difficulty: Beginner | Time: 45-60 minutes
What You’ll Need
Tools & Materials:
- Sturdy, lidded storage box or durable bag
- Reflective warning triangle or approved roadside warning device
- Flashlight or headlamp with spare batteries
- Phone charging cable and charged power bank
- First-aid kit
- Work gloves
- Basic vehicle supplies suited to your car
- Water and shelf-stable snacks
Knowledge:
- Know where your vehicle’s manual and hazard-light controls are
- Know how to contact roadside assistance
- Know your vehicle’s tire type and whether it includes a spare
Check your owner’s manual before buying tools, fluids, or tire equipment. Vehicle needs vary, and some cars have no spare tire. Choose supplies that fit your climate and the number of people who usually travel in the car. Do not store medicines, pressurized products, batteries, or other temperature-sensitive items in a hot or freezing vehicle unless their labels allow it.
Everlit Survival Car Emergency Kit with Digital Tire Inflator and First Aid Kit
For drivers who want one kit to cover several common roadside needs, Everlit is our most balanced pick. It lists a digital 12V tire inflator with automatic shutoff and an LED light, plus jumper cables, a 108-piece first aid kit, a reflective warning triangle, tow rope, gloves, and a flashlight. The combination gives the driver options for a low tire, a jump-start, a minor first aid need, or making the stopped vehicle more visible.Its clearest advantage over the VCANENERGY kit is not the number of first aid items; VCANENERGY lists more. Everlit earns the lead because it explicitly includes a warning triangle and tow rope, and it identifies the cables as 12 feet, 8 gauge, and 300 amps. That detail gives buyers a better basis for checking fit against their vehicle. Both kits list automatic shutoff and an LED on their inflators, but neither description provides the maximum pressure, so we cannot compare inflation capability from the supplied information.There are meaningful limits. The stated cable output and standard-vehicle wording may make this a poor match for drivers with vehicles that need heavier-duty jump equipment. Its one-year warranty is shorter than VCANENERGY’s two years, and a 108-piece first aid count is smaller than VCANENERGY’s 138. We would choose Everlit for balanced roadside coverage and clearer cable specs, while drivers prioritizing winter tools or the largest listed first aid kit should look at VCANENERGY.
Pros:
- Combines inflator, jumper cables, first aid, and roadside visibility tools
- 12-foot, 8-gauge cables are specified at 300 amps
- Inflator includes automatic shutoff, LED light, and three nozzles
- Includes a reflective warning triangle, tow rope, gloves, and flashlight
Cons:
- Description limits cable suitability to standard vehicles
- Inflator maximum pressure is not stated
- One-year warranty is shorter than VCANENERGY’s listed warranty
Best for: Drivers who want a balanced kit with jump-starting, tire inflation, basic first aid, and visible roadside safety items.
Not ideal for: Owners of vehicles that require heavy-duty jump equipment, or drivers who prioritize a larger first aid kit and winter brush.
Bottom line: We recommend Everlit for its well-rounded set of core roadside tools and the clearest cable specifications in this comparison.
“We recommend Everlit for its well-rounded set of core roadside tools and the clearest cable specifications in this comparison.”
Car Emergency Safety Kit with Air Compressor, Jumper Cables, First Aid Kit, Snow Brush, and Ice Scraper
VCANENERGY is the strongest match for drivers who want substantial first aid supplies and seasonal tools in the same trunk kit. Its 170-piece set includes a 138-piece first aid kit, a 22-piece car tool kit, jumper cables, a digital inflator, and a snow brush with ice scraper. That winter equipment gives it a practical edge over Everlit when frost and snow are routine parts of the drive.The inflator is described with a digital PSI setting, automatic shutoff, LED light, and three extra nozzles. Those details help explain how a driver can set a target and use it in low light, though the description does not state its maximum pressure or inflation rate. Like Everlit, VCANENERGY specifies 12-foot, 8-gauge jumper cables; unlike Everlit, it does not give a cable output figure in the supplied specs. Everlit also names a warning triangle and tow rope, making it the clearer choice for drivers who place visibility and towing support first.VCANENERGY lists a two-year warranty, the longest stated here, and stores the kit in a bag. That may be convenient for trunk storage, although the full set still requires room and the description does not give the bag’s dimensions. We would pick it for a driver building coverage around first aid and winter conditions. Drivers who want a more explicit list of visibility equipment should compare it with Everlit, while those seeking rainwear and a headlamp may prefer B0DQQ1NFM6.
Pros:
- 138-piece first aid kit is the largest stated first aid component in this comparison
- Includes a snow brush and ice scraper for winter conditions
- Inflator lists digital PSI setting, automatic shutoff, LED light, and three nozzles
- Two-year warranty is longer than the other listed warranties
Cons:
- Inflator maximum pressure and inflation rate are not specified
- Jumper cable output is not provided
- Description does not list a warning triangle or tow rope
Best for: Drivers in snowy or icy regions who want a large listed first aid kit, basic vehicle tools, and a digital inflator together.
Not ideal for: Drivers who need clearly specified inflator capacity, documented cable output, or an explicitly listed warning triangle and tow rope.
Bottom line: Choose VCANENERGY when first aid supplies and winter tools matter more than the most fully described jump-start and visibility equipment.
“Choose VCANENERGY when first aid supplies and winter tools matter more than the most fully described jump-start and visibility equipment.”
Car Roadside Emergency Kit, with Jumper Cables Automotive Kit,Car Safety Roadside Assistance Kit Headlamp,Tow Straps, Safety Hamm…
This kit takes a more hands-on roadside approach than the other two: the listing calls out rainwear, a headlamp, gloves, tow straps, safety hammers, and an air compressor, alongside jumper cables, screwdrivers, tape, and first aid bandages. Those items may appeal to drivers who want weather protection and a source of light while dealing with a breakdown. Its compact blow-molded case is also presented as easy to keep in a trunk or spare-tire compartment.Compared with Everlit, B0DQQ1NFM6 gives more emphasis to rainwear and tow straps, but Everlit provides specific cable length, gauge, and output figures as well as a reflective warning triangle. Compared with VCANENERGY, this kit names a headlamp and safety hammers, while VCANENERGY provides a much more clearly counted first aid kit and describes the inflator controls. Here, the listing says the compressor can inflate a tire but does not give a model, pressure limit, inflation rate, or power details. We should treat that as an information gap, not assume it will meet every tire or vehicle need.The broad collection sounds useful, but the description leaves the contents and capabilities harder to verify than the other picks. It does not specify cable length or gauge, and it names first aid bandages without stating a kit size. We would consider it for drivers who value rain protection, a headlamp, and a compact hard case. Drivers who want clearly documented cable and inflator details should choose Everlit or VCANENERGY instead.
Pros:
- Includes rainwear, headlamp, gloves, and safety hammers
- Lists tow straps and an air compressor among the roadside equipment
- Blow-molded case is intended for trunk or spare-tire-area storage
Cons:
- Jumper cable length, gauge, and output are not specified
- Inflator pressure, rate, and power details are not provided
- First aid supplies are described as bandages without a stated kit size
Best for: Drivers who want a compact stored set with rainwear, headlamp, towing gear, and basic roadside tools.
Not ideal for: Buyers who need detailed jumper cable and inflator specifications, or a clearly quantified first aid kit.
Bottom line: We see this as a useful weather-oriented gear set, but its less specific equipment details keep it behind Everlit and VCANENERGY.
“We see this as a useful weather-oriented gear set, but its less specific equipment details keep it behind Everlit and VCANENERGY.”
As an Amazon Associate we earn from qualifying purchases.
Before You Start
Park safely at home before organizing the kit. Do not inspect or pack supplies on a road shoulder. Keep the kit reachable without unloading heavy cargo, and do not block the driver’s view, airbags, pedals, or access to emergency exits. If you break down, move away from traffic only when it is safe; call emergency services for immediate danger.
Step-by-Step Instructions
Step 1: Choose a storage container
Select a durable bag or lidded box that fits your vehicle’s storage area and keeps supplies together. Use smaller labeled pouches for first aid, visibility, charging, and vehicle items. Place the container where you can reach it safely, such as the trunk or cargo area, while keeping it secured so it cannot slide during sudden braking.
Tip: Avoid storing the kit loose in the passenger footwell or on a seat.
Check: The container fits, stays closed, and can be reached without interfering with safe driving.
Step 2: Pack visibility and lighting supplies
Add a reflective vest for each regular traveler, a reflective warning triangle or locally approved warning device, and a flashlight or headlamp. Include spare batteries if the light uses replaceable batteries. Check that reflective items are clean and that the light turns on. Store these supplies near the top of the container so you can reach them first.
Tip: Follow local rules for placing warning devices. Never walk into traffic to set one out; use it only when you can do so safely.
Check: You can quickly find a working light and reflective gear without searching through the full kit.
Step 3: Add communication and contact information
Pack a charging cable that matches your phone and a charged power bank. Add a written card with roadside assistance details, emergency contacts, vehicle make and model, and any relevant insurance or membership phone numbers. Keep sensitive information limited to what someone assisting you may need.
Tip: Test the power bank and recharge it on a schedule; an empty battery will not help during a delay.
Check: The contact card is readable, and the power bank can charge your phone.
Step 4: Prepare for minor injuries and basic comfort
Pack a first-aid kit with bandages, gauze, antiseptic wipes, and disposable gloves, checking expiration dates and replacing used items. Add water, shelf-stable snacks, tissues, hand sanitizer, and a warm blanket. Scale quantities to the usual passengers and travel length. Store water and food in a way that protects them from leaks and replace them before their labels’ dates or after heat damage.
Tip: Do not include medication for other people to use unless it is clearly labeled and appropriate for them.
Check: First-aid supplies are in date, and each regular traveler can access basic water and warmth.
Step 5: Add vehicle-specific supplies
Read the owner’s manual and add only equipment appropriate for your car, such as a tire pressure gauge, a compatible tire inflator, jumper cables or a jump starter, and a small tool kit. Confirm that cables and jump starters match your vehicle and that you know the safe connection procedure. Include washer fluid only if it can be stored safely and will not leak.
Tip: Some vehicles require a particular jump-start procedure or have no serviceable 12-volt battery. Follow the manual instead of guessing.
Check: Each tool fits your vehicle, and you can identify its intended use in the manual.
Step 6: Plan for weather and local conditions
Add seasonal items that suit your routes: an ice scraper and warm hat in cold regions, or extra water and sun protection in hot climates. If you travel in snow, consider traction material and a compact shovel. For rural or long-distance routes, carry additional water and snacks. Keep items secured and avoid adding gear that exceeds safe storage capacity.
Tip: Cold can reduce battery performance, and heat can spoil supplies or damage electronics. Check storage labels and your vehicle maker’s guidance.
Check: The kit addresses the weather and road conditions you commonly encounter.
Step 7: Check, label, and secure the kit
Label the container and its pouches, then place it in the chosen storage area and secure it against movement. Keep essential vehicle documents and the owner’s manual accessible according to your vehicle’s storage layout. Write a reminder to inspect the kit every six months and before a long trip.
Tip: Show regular passengers where the kit is and how to find roadside assistance information.
Check: The kit is secured, its contents are easy to identify, and a review date is on your calendar.
Common Mistakes to Avoid
- Packing tools that do not fit the vehicle or that the driver cannot use safely. — Check the owner’s manual and learn the correct procedure before relying on tire or jump-start equipment.
- Putting the kit under heavy luggage or somewhere difficult to reach. — Store it in a secured but accessible location, with visibility and communication supplies near the top.
- Leaving food, water, batteries, or electronics in the car until they fail or spoil. — Inspect dates and condition twice a year, recharge electronics, and replace items affected by temperature.
- Assuming a warning triangle or roadside repair is safe in every breakdown location. — Put personal safety first, follow local guidance, and call for professional help when traffic or conditions make roadside work unsafe.
Troubleshooting
Problem: The kit does not fit in the planned storage area.
Solution: Use a soft-sided bag or separate compact pouches. Keep visibility, communication, first aid, and weather essentials; move nonessential bulky items to another secured storage spot.
Problem: The vehicle has no spare tire or uses a special tire repair system.
Solution: Check the manual for the supplied mobility kit and its limits. Learn how to contact roadside assistance, and do not use sealant or an inflator unless it is approved for that tire and vehicle.
Problem: The power bank is empty when needed.
Solution: Recharge it at home and after use, then add a recurring calendar reminder to check its charge. Carry a compatible vehicle charger if appropriate for your car.
Problem: Supplies are damaged, expired, or affected by heat or cold.
Solution: Replace them and move temperature-sensitive items indoors between trips if their labels call for controlled storage. Recheck the kit before long journeys.
What Success Looks Like
Your completed kit is secured in the vehicle, easy to reach, and contains working lighting and reflective gear, phone charging and assistance contacts, first aid, water and comfort supplies, and tools suited to your car. You can name the kit’s location, explain how to contact help, and identify which items need regular inspection.
Next Steps
Set a six-month reminder to check expiration dates, power-bank charge, flashlight operation, and seasonal supplies. Refill anything used after a trip. Before long drives, confirm roadside assistance details, check tire condition and pressure, and review weather along your route. If a breakdown occurs, prioritize getting to a safer location and contacting help over attempting a repair in traffic.
Frequently Asked Questions
Do I need jumper cables or a jump starter?
They can help with a dead 12-volt battery, but the correct method depends on your vehicle. Check the owner’s manual for approved connection points and procedures. A jump starter must be compatible, charged, and used as directed.
How much water should I keep in the car?
Plan for the number of travelers and the time you might wait for help, with extra for hot weather or remote routes. Replace water according to its packaging guidance and after exposure to conditions that could compromise the container.
Where should I store the emergency kit?
Use a secured cargo or trunk area where the kit remains reachable without blocking sightlines, pedals, airbags, or emergency exits. Keep frequently needed visibility and communication items near the top.
How often should I inspect the kit?
Check it at least every six months and before long trips. Test lights and power banks, review first-aid dates, replace used supplies, and adjust seasonal items as conditions change.
Fall Picks
fall essentials
As an affiliate, we earn on qualifying purchases.